Recycled Grocery Totes


This is the end product of many hours of labor. It is a Recycled Grocery Tote. It was free, minus the groceries I had to buy and the thread, and it is 99% made with recycled materials. Go green team :)

Here is what I started with. Tons and tons of Meijer bags. You can use whatever kind of plastic bags you have, it is just easier if they are all the same bags.

Here is what you need:
1. Iron
2. Parchment Paper
3. Tons of plastic bags (I used 40)
4. Scissors
5. Sewing Machine
6. Thread
7. Fabric (optional if you want to add words to the outside)

The first step is to cut the bags into manageable pieces. I cut off the handles and the words and the bottom seam, and when I opened it up, it looked like this.

Once you have 40 rectangles cut, you will begin to fuse the plastic together. This step is done with a lot of love and some practice. Meijer bags are a little on the thin side unlike Target bags, but I don't shop there enough. I used 8 plastic rectangles for each piece. You line up all 8 of the pieces of plastic and then cover with parchment paper. Start with your iron on a low setting and try a small corner to see what happens. The plastic will wrinkle a bit and only shrink a small amount. It should not shrivel up quickly. If it does, the iron is too hot. Once you have the right temperature, start in the middle and work your way to the outside to ensure no bubbles sneak in. This is the hardest part, so don't get frustrated. It takes some time to get use to it. Once you get the one side good, flip over and repeat on the back side. You know you are done when all of the plastic is combined and there are no bubbles.

This is what a completed sheet looks like. It should be pretty stiff and have those little wrinkles.


You will need 5 sections.


Once you have fused all of your plastic, you will need to cut it to the right size. I did not make any templates. All I did was make 2 large rectangles for the front and back, then I made 2 long rectangles for the sides and finally, 1 fat rectangle for the bottom. Just make sure they line up as you cut them. Sorry for all of the exact measurements :) Once all pieces are cut, you will need to start the sewing. You can sew it just like fabric. I used black so it would be visible, and I did a zigzag stitch at a 2 wide.


I sowed all of the sides to the bottom to make it the easiest.


Then I sewed the sides together. To make it a little nicer on the eyes, I added some scrap pieces of fabric as letters. These I hand stitched on. Next time, I would sew them on prior to assembling the bag.


Last step was the handles. I cut long strips from the extra plastic I had and added a strip of black fabric on the inside to reinforce them.


Lastly, I hand stitched the handles on the bag.

Voila!! I got rid of all my unwanted plastic bags, and I was eco-friendly.


 Inspiration comes from MADE

Things That Make Me Happy


Things That Make Me Happy (lately)
Lately there have been so many things, but here are just a few

1. My Baby 
(aka Izzie our dog)
She makes me smile. Even after she chews up something, she is still so stinken cute in all her shame and guilt :)
2. Random Days Off
Yesterday I called into work to see what there was, and low and behold he said, just plan on coming in tomorrow. I smiled and fist pumped in the rain at the gas station. Then I went home, cleaned the kitchen, made apple butter, did some crafting, baked cookies, and watched the office.
3. Laughing
I have enjoyed the freedom of laughter. And I call it freedom because I can't laugh around people I'm not close with. My best laughter comes from deep down and only happens with my closest friends and family. It is this weird thing to be uninhibited in your laughter. To roll on the floor or curl up into a ball because you can't control what your body is doing. I had some great laughter last night with Kenny and Tuesday night with Leslie, Katie, and Kyrie. rotfl :)
4. My Grandma Toni
She raised two kids as a single mom with a farm. She worked everyday as a secretary at a job she didn't love. She rarely missed one of my games (and I played a lot of sports). She gives more than she has. She loves where she came from and doing things how her mom use to do them. She retired over a year ago, and has been enjoying every last second of it. I am going over today to do some canning! Below is her barn and pasture.

Happy Thursday!!!

Old Window Refashioned Into Calendar

Ever since I saw a "window calendar" hanging in my friend's house, I knew I must get one, but I did not want to buy one, so I waited. I waited until we moved into our new house. And one day while I was waiting, I stumbled upon a bunch of old windows hiding under the stairs. What luck! We bought the house from my parents and it turns out, they had replaced the windows a year ago and saved all of the old windows for future use. 

This was probably the easiest thing we've done to our house. I found the window that was in the best shape and had 6 glass panels. Then I screwed on some brackets on the back, and put two nails in the wall and hung it up. Now we just write on it whatever our little hearts desire. Sometimes it is our calendar and other times it is little notes. It is like having a little whiteboard. Below are some pictures. I didn't bother to sand it or repaint it because I love the old, rustic feel. I currently have it decorated for fall.


I am planning on selling the rest at a craft show this winter :)

Wowza

Wowza

Winning and Losing

I coach two soccer teams. One is U11 and the other is U10. And the first question 99% of people ask is, how did you guys do this weekend, or did you win? This mentality of winning and losing has stirred something in me. Not a good thing. I have found myself focusing too much on winning, and not enough on the players. I have found myself frustrated with them at times when they are losing, and I have had this sad feeling after we lose. This has to change. They are human beings and their lives are bigger than these soccer games.

The things that I want to focus on for the rest of the season.

  1. Always giving 100% - The only game that I was ever disappointed was when we lost 5-1 because we lacked heart. We gave up, we got beat to every ball, we fell apart. It is one thing to get beat by a better team, but to lose 5-1 to a team that is fairly even with us is in fact disappointing. I want to teach them to fight, even when they are down.
  2. Do not be afraid to fail - I need to encourage them to fail. To take risks without the fear of a coach yelling at them.
  3. To be encouragers - when they are not in the game, they need to cheer on their teammates. At practice if someone is having an off day, I want to teach them to build them up.
  4. To have lives outside of soccer - Soccer is fun, but it will not last forever.
  5. Become problem solvers - I want to help them to think for themselves. To teach them that there is more than one way to do something. To not tell them every second what they should do. To encourage when they make good decisions on their own.
Next time someone asks me how our games went, I will not tell them whether we won or lost, I will tell them of the improvements we made. And I vow not to ask if someone one or lost, I will ask them more important questions, did you have fun, what did you learn, what will you work on to get better for next time?


T-shirt Pom Poms

If you have extra t-shirts laying around, here is a great idea for them. You can make Pom Poms. They do not serve a functional purpose, but they are neat little decorations. Below is a tutorial.
Click to go to website
Find some old t-shirts that you don't wear anymore. I used Kenny's because they are bigger.
You will also need some cardboard to cut out your forms. The first step is to cut out two templates like below. Mine were 6" for the outside diameter and 3" for the inside diameter. You will also need to cut a lot of t-shirt strips. This pile of strips were 1/2" wide. If you start at the bottom of the t-shirt, you can cut horizontal strips.
Once you have a nice pile of strips and your cardboard templates, you will need to place one of the strips on top of the form, like below.
Next, place the other template on top.
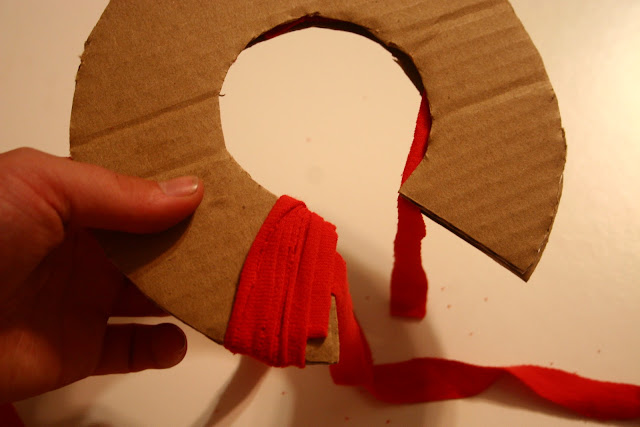
Now you will start creating the pom pom by wrapping the template with the strips of fabric. It is important that each new strip, you line up the edge of the strip with the outside of the cardboard.
When you end a strip, you add a new one by overlapping where you ended. This will keep it from coming undone. 
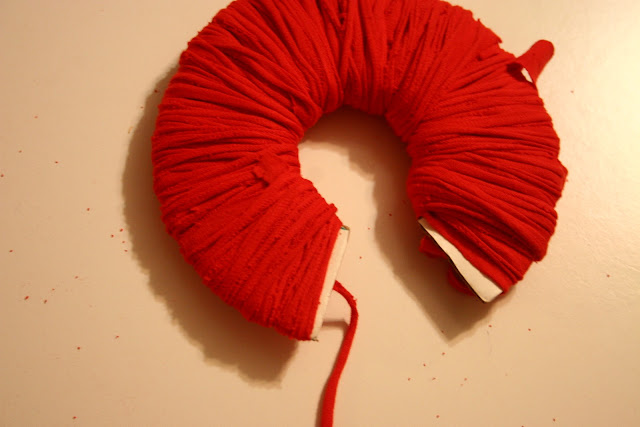
Once you make it to the end, you start from that end and go back. You will do this three times, or so you have three layers.
Once done wrapping, take the string that you pinched between the templates and wrap them together. Below, I tied a knot. That was my first pom pom, and I would not recommend the knot, instead, just wrap the strings around each other a couple times.
Now you will start cutting. Make sure you have sharp scissors, as this will make your life 100% easier. This part is not easy. I place the scissors between the templates and started cutting. It is important to hold down the strings firmly while you cut. You can do this by pushing down on the template.

Once you are done cutting, you can tighten the string between the templates and remove them. You will tighten the middle string one last time and tie a knot. Do not tighten too much or it will break and you will be left with a pile of strips. Trust me, I would know :) Once you tie the knot, you will have to even the strips out and fluff your pom a little. The last step is to groom your pom. Just give it a little hair cut to get it even. And voila, you have a pom pom!


**Found this project on Pinterest compliments of Craftaholics Anonymous. 

Thrifty Finds

Our first two years of marriage I have been torn. I've always known that the house we live in will not be our long term home. It is only temporary. Five more years hear, tops. The natural part of me says Why fix up the house, why spend money to decorate it, we are only going to move out. Luckily the sane part of me said Five years is an eternity so live a little :) With that being said, I have recently been collecting things to make our house a home. To make it ours. And the good thing is, most of the stuff will move with us anyways. Here are some of my recent items that have been added to our home